
Pull the driver's door shut on a 1968 or 1969 GTO and the first thing that tells you what car you're sitting in isn't the engine note. It's the dash. Pontiac put four full instruments in a hooded pod ahead of the wheel and called it the Rally Gauge Cluster, and if you know what you're reading, it tells you more about the car's history than the trim tag does.
Car Features
7 min read
The Rally Gauge Cluster: Reading a 1968-69 GTO Dash
Four gauges, a handful of part numbers, and the wiring behind them tell a more honest story about a 1968-69 GTO than the trim tag does.
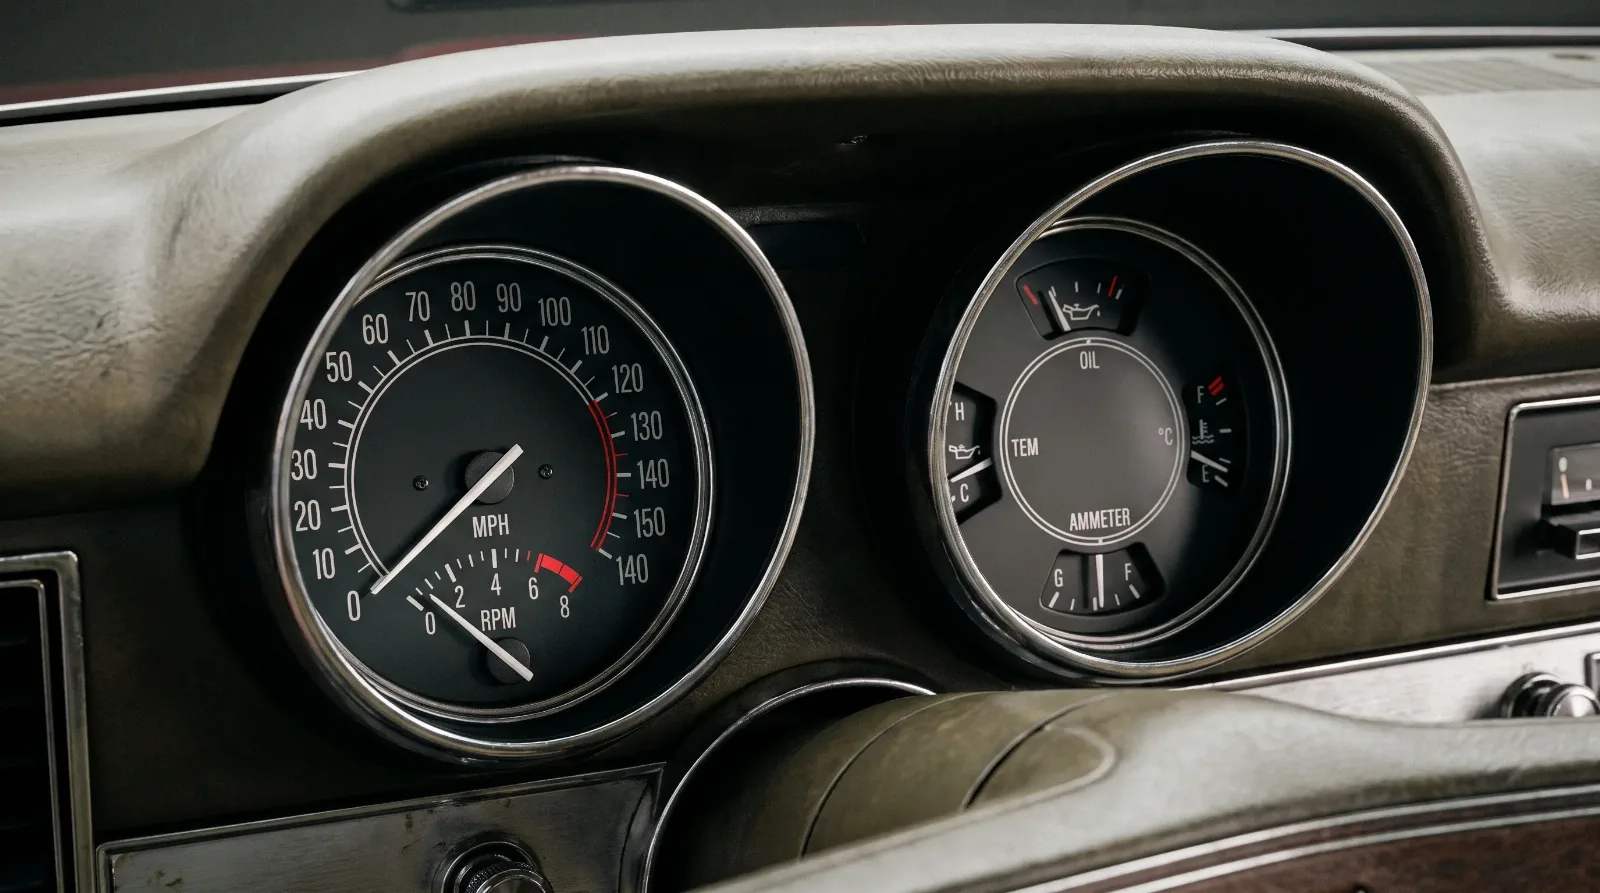
I've spent enough years pulling GTO dash pads apart and cross-referencing them against factory service literature to know that the Rally cluster wasn't just a styling flourish. It was Pontiac's answer to a real complaint: base Tempest and LeMans dashes ran an idiot-light setup, a single speedometer flanked by warning lamps for oil, temp, and amps. A driver pushing a 400-cubic-inch V8 through second gear on a Saturday night wanted more than a red light after the damage was already done. The Rally cluster gave him a 120-mph speedometer, a matching-scale tachometer, and gauges for oil pressure, water temperature, and amperes, all housed in a black-face pod trimmed to look like it belonged in something faster than a Bonneville.
What the cluster actually contains
The 1968-69 Rally Gauge Cluster sits in a pod ahead of the steering column, distinct from the earlier 1966-67 layout that Pontiac reworked when the Endura-era GTO got its new dash architecture to match the restyled body. Four openings, symmetrical, with the speedometer and tach as the large dials and oil pressure, temperature, and amp gauges filling the smaller positions. The lettering is white on black, small enough that Pontiac assumed you'd glance rather than study, which was the point. A driver working through a passing maneuver doesn't have time to interpret a needle position against a memorized baseline. He needs the shape of the sweep to register in his peripheral vision.
The tachometer redline position moved depending on engine and year, which is the detail that trips up a lot of buyers doing a cursory inspection. A 1968 car with the base 350-hp 400 has a different redline marking than a Ram Air car, and if someone's swapped a tach face during a restoration without checking the original part number, you end up with a gauge that reads correctly but is calibrated for the wrong engine. I always tell people: pull the cluster and check the part number stamped on the back before you assume the gauges match the drivetrain.
Reading the cluster for originality clues
The clock delete option matters here too. Buyers ordering the Rally cluster in 1968-69 could specify it with or without the clock, and the clock position, when deleted, was typically filled with a blank or, on some build combinations, an additional small gauge depending on year and option code. A car with a clock where the build sheet says there shouldn't be one, or vice versa, is either a running production change Pontiac made mid-year or evidence of a parts swap somewhere in its history. I've seen both. The honest answer is you need the build sheet or a tank sticker to be certain, not just the dash in front of you.
Wiring behind the cluster is its own conversation, and it's a deep enough rabbit hole that I'd point anyone chasing gremlins back there to read on about the harness quirks specific to these two model years, because the gauge cluster's electrical connections are exactly where a lot of those problems surface first. A gauge that reads erratically is as likely to be a bad ground behind the dash as a failing sender at the engine.
🔧 Inspection Priorities
- Backlighting condition. The green-tinted backlighting on these clusters fades and yellows with UV exposure. A cluster with even, consistent illumination across all four faces usually means either low sun exposure over its life or a replacement bulb kit, both fine, but check that the lens hasn't been swapped for a non-original tint, which shows up under a black light as a mismatch.
- Needle sweep and sticking. Start the car cold and watch the oil pressure needle. A sluggish sweep or a needle that sticks at zero and then jumps usually means a gauge movement that's dried out or a sender going bad, either a moderate repair, not a walk-away issue, but budget for it.
- Speedometer cable wear. A speedometer that reads high or low at a known highway speed points to a stretched or worn cable, cheap to replace but easy to overlook during a test drive if you're not paying attention.
- Non-original tach substitution. Check the redline position against the engine's actual factory redline. A mismatched tach face is a common giveaway of a parts-bin repair from decades ago and affects both accuracy and originality scoring.
Why the details matter to value
A correct, functioning Rally Gauge Cluster with matching part numbers and the right clock configuration for the build sheet is worth real money to a documentation-focused buyer, more than most people expect for what's essentially a dash pod. Reproduction faces exist and they're good, good enough that I've had to pull a cluster apart to confirm originality rather than trust a visual inspection. The reproduction lettering style is close but not identical to the original silk-screening under magnification, and that's the kind of thing a judge at a sanctioned show will check.
Servicing a cluster without wrecking its value
If you're the one doing the work rather than paying someone else, take the cluster out with more patience than the job seems to demand. The bezel screws are small, the plastic lens is brittle after fifty-some years of temperature cycling, and the wiring connector on the back is not designed to be yanked. I use a plastic trim tool to break the bezel loose from the dash pad rather than prying with a screwdriver, because a chipped bezel edge is permanent and it's the first thing a knowledgeable buyer notices.
Once it's out, resist the urge to disassemble the gauge movements themselves unless you know exactly what you're doing. The oil pressure and temperature gauges use a bimetal strip and a heating element calibrated at the factory, and an amateur cleaning attempt can throw that calibration off in a way that's hard to diagnose later. If a gauge reads wrong, check the sender and the wiring first. Nine times out of ten that's the actual fault, and the gauge movement itself is fine.
Reassembly is where people get sloppy. The cluster has to seat flush against the dash pad or you get a visible gap that looks wrong even to someone who couldn't tell you why. Torque the bezel screws evenly, in a cross pattern, the same way you'd seat a wheel, and don't overtighten into brittle plastic that's had five decades to get more brittle.
What I tell people evaluating a car for purchase is simple: the gauge cluster is a small, contained system, and small contained systems are exactly where you can verify a seller's claims cheaply. Pull the cluster, check the part numbers, check the wiring behind it, and you've learned more about whether this car has been honestly represented than you will from ten minutes of walking around it in a driveway.
"I've had owners tell me their gauge cluster was original because it looked period-correct from the driver's seat. Looking period-correct and being the numbers-matching cluster that left the factory on that specific car are two different claims, and only one of them holds up when you pull the dash apart."
Tom Ramirez
The Rally Gauge Cluster is a small piece of a much larger car, but it's also one of the more honest witnesses to that car's history, if you know how to read it. Four gauges, a handful of part numbers, and a wiring harness behind them tell a story that the paint and the trim tag can't.
Sources and notes
Related Reading
Have a
Pontiac GTO
for Sale?
Reach thousands of serious classic car collectors across the US.
Sell It Here →
Are You a Classic Car Dealer?
List your full inventory and connect with targeted classic car buyers.
Join as a Dealer →

About the author
Tom Ramirez
Corvette researcher and historian based in Bowling Green, Kentucky. Two decades documenting Corvette production history from original factory records.
Related Listings - Pontiac GTO

Comments
Be the first to comment on this article.