
A stock C10 frame was engineered around a straight six or a small block making a couple hundred horsepower, moving at work truck speeds on work truck errands. Once real power goes into that chassis, the frame starts doing things it was never asked to do. The two rails twist against each other under hard acceleration, under braking, over anything but a smooth straight road, and that twist shows up as a wandering feel, cab shake, and doors that stop closing right somewhere around the second summer of hard driving. Subframe connectors fix the actual problem instead of chasing the symptoms one at a time. Here is how the job goes when it is done right, and where it goes wrong when it is not.
Restoration & Tech
7 min read
Installing Subframe Connectors on a High-Horsepower C10
A shop-floor walkthrough of boxed and gusseted subframe connectors, why bolt-in kits fall short, and the weld sequence that keeps a high-power C10 frame from twisting.
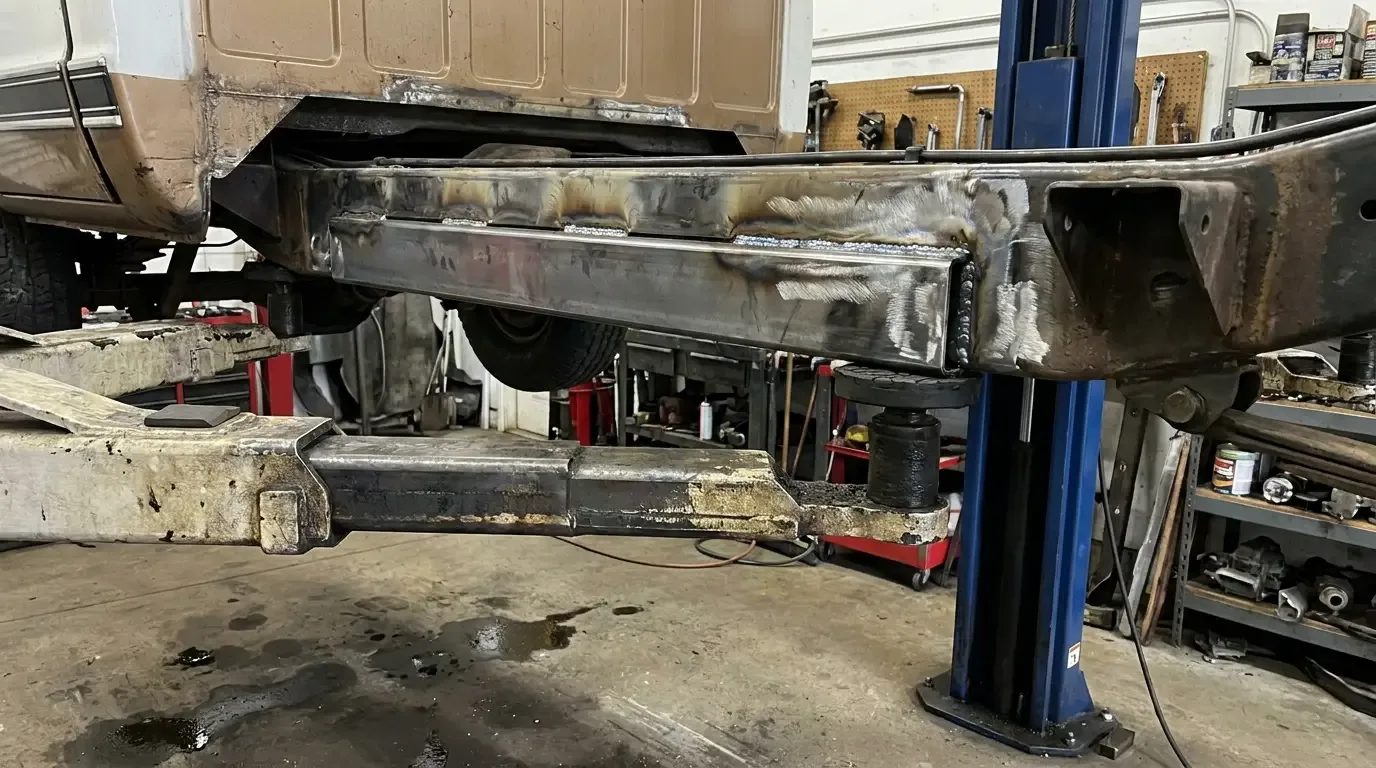
Why the frame twists in the first place
The C10 frame is a ladder design, two full length rails tied together by crossmembers. That layout is fine for carrying a load straight down through the springs. It is not built to resist the two rails moving independently of each other, which is exactly what happens under hard acceleration when the rear end tries to rotate the axle housing forward and the front of the frame does not get the memo at the same instant. Add a stiffer engine and a transmission making real torque, and that lag between front and rear becomes something you can feel through the seat and see in the door gaps.
If the reason you are staring at this problem is a fresh engine swap, the LS swap guide covers the powertrain side of that decision. This is about what holds the chassis together once that power is actually there to move it.
Bolt-in vs weld-in, and why the choice matters
Bolt-in connectors exist and they are better than nothing, but they are not the same job. A bolted connector flexes at every bolt hole under load, and over time those holes elongate, which puts you back close to where you started. A welded connector becomes part of the frame. There is no give to elongate because there is no joint left to move.
| Method | Stiffness gain | Labor | Reversibility |
|---|---|---|---|
| Bolt-in connector | Moderate, degrades over time | A weekend with hand tools | Fully reversible |
| Weld-in connector, tacked only | Good short term | A day with a welder and a lift | Not practical to remove |
| Weld-in connector, boxed and gusseted | Best, holds long term | Two full days done right | Permanent |
For a truck that is going to see real power on a regular basis, the boxed and gusseted weld-in is the only version of this job worth doing. Anything less is a truck that is going to need the job done again in a few years, and the second time costs more because now there is old, stressed metal to cut out first.
Setting the truck up before the welder ever comes out
This is the part that gets skipped and it is the part that decides whether the job holds up. The truck needs to be sitting level, on all four wheels, at its normal ride height, not up on a lift with the suspension hanging loose. Weld a connector to a frame that is sitting unloaded and you have just welded in a shape that is wrong for how the truck actually sits on the road. Get it on a level surface, load the suspension to normal ride height with jack stands positioned to simulate that, and check with a level across both rails before anything gets tacked.
Measure diagonally corner to corner before you start. If the frame already has a twist in it from age or a prior hit, welding connectors onto a frame that is not square just locks the twist in permanently. Fix the frame first. Connectors are not a substitute for a straight chassis, they are a stiffener for one that is already right.
The weld sequence that keeps the frame straight
Tack it in four spots first, front, rear, and one in the middle on each side. Step back and recheck your level and your diagonal measurements before a single full weld bead goes down. Heat moves metal, and a connector welded solid in one long pass on one side before the other side is even tacked will pull the frame out of square while you are still working on it.
Once the tacks check out, weld in short sections, alternating side to side, letting each section cool before moving to the next. Box the connector where it meets the frame rail, do not just lay a flat plate against the outside face and call it done. A boxed section resists twist in a way a flat plate never will, because now the load has to travel through a closed shape instead of bending an open one. Gusset the ends where the connector meets the front and rear crossmembers. That transition point is where the stress concentrates, and an ungusseted end is where a connector job that looked fine for a year starts cracking.
"Guys weld these in flat, one long bead, no boxing, no gussets, and it looks done. It is not done. It is a plate that is going to crack right where the stress actually lives, at the ends, in about the same amount of time it would have taken to do it right the first time."
Ray Delgado
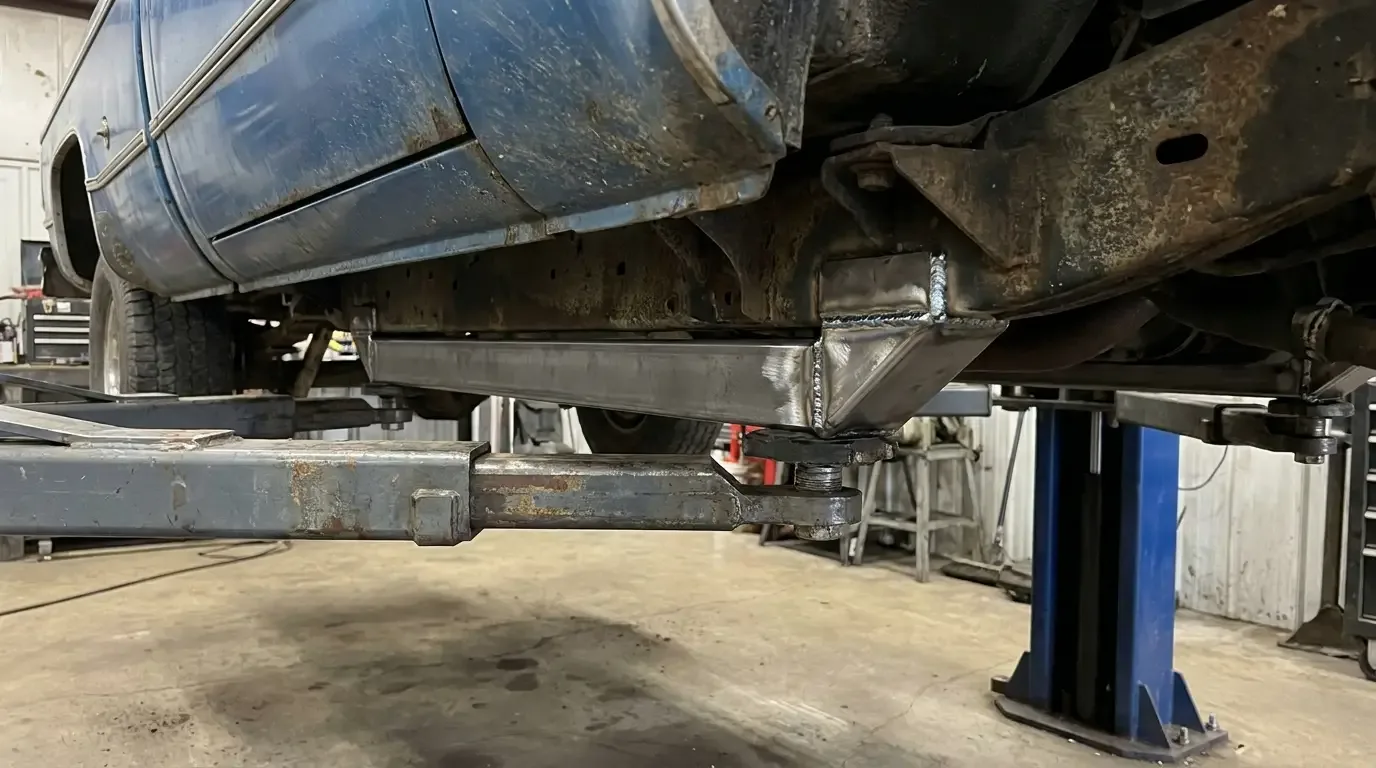
What changes once it is done, and what it costs
A properly boxed and gusseted connector job changes how the truck feels almost immediately. Doors close the same at idle as they do coming hard off a corner. The steering feel firms up because the front of the frame is finally moving with the rear instead of a half second behind it. None of this shows up on a spec sheet, it shows up the first time you drive the truck afterward and notice what stopped happening.
Material for a quality boxed kit typically runs $150 to $400 depending on steel gauge and brand, and shop labor to do the job correctly, including the leveling and measuring steps that most people skip, adds another $250 to $500 or more on top of that at a shop that actually boxes and gussets the connector instead of tacking a flat plate to the outside of the rail. Done at home with a decent welder and the patience to measure twice before every pass, the cost drops to materials plus a weekend, but only if the welding itself is solid. This is not the job to learn TIG welding on.
Once the chassis stops flexing, the next thing worth sorting out is what to do about the exhaust note once it's stiff and strong, because a truck that finally puts its power down cleanly deserves an exhaust that sounds like it means it.
Sources and notes
- Installer discussion on typical subframe connector welding labor rates
- Shop quotes for subframe connector installation cost
- Owner-reported costs to weld in subframe connectors
- Labor cost breakdown for welding in subframe connectors
- Forum comparison of subframe connector install pricing by shop type
- Summit Racing weld-on subframe connector kit listings
Related Reading
Have a
Chevrolet C10
for Sale?
Reach thousands of serious classic car collectors across the US.
Sell It Here →
Are You a Classic Car Dealer?
List your full inventory and connect with targeted classic car buyers.
Join as a Dealer →
#Restoration
#chevrolet c10
#c10 subframe connectors
#chassis stiffening
#c10 chassis mods
#fabrication

About the author
Ray Delgado
Metal fabricator and chassis builder who has spent 25 years turning flat sheet and mild steel into hot rods, gassers and restomod underpinnings.
Related Listings - Chevrolet C10
More in Restoration & Tech




Comments
Be the first to comment on this article.