
Paint gets the credit, but the primer and the sanding underneath decide whether a finish still looks straight in five years. A mirror gloss laid over a wavy panel only advertises every flaw. I teach it the same way every time: the shine is the last 10 percent of the job, and the foundation is the other 90.
Restoration & Tech
7 min read
Epoxy Primer, Sealer and Block Sanding
Epoxy primer, filler, high-build and guide coat in the right order, plus how to block sand a classic car body flat before paint.
If you are planning the whole project, start with the bigger picture of painting a classic car, then come back here for the stage that most first-timers rush. Block sanding is slow, dull, and the reason a good shop earns its rate.
Why epoxy primer goes on first
Bare steel flash rusts in hours once it is sanded or stripped, sometimes overnight in humid air. Epoxy primer is the product that seals it. It cures to a hard, waterproof film that bonds to clean metal better than most urethane or lacquer primers, and it does not absorb moisture the way a porous filler primer can. That is why most restorers shoot epoxy directly over bare metal and old, sound paint that has been scuffed.
Prep the metal first. Strip or sand to bare steel, then wipe it down with a wax and grease remover using two clean rags, one wet and one dry. Skin oils from your fingertips are enough to cause fisheyes, so wear gloves. Epoxy is a two-part product, so mix by the ratio on the can and respect the induction time (the wait after mixing) and the pot life. Both vary by brand, so read the technical data sheet rather than trusting a forum post.
Where filler and high-build primer fit
The order matters, and it is where I see the most mistakes. The sequence on a clean panel runs like this:
- Bare metal, cleaned and degreased.
- Epoxy primer to seal the steel.
- Body filler only where the metal needs it, thin and over scuffed epoxy or bare metal as the filler maker specifies.
- Urethane high-build (also called primer surfacer) to fill sanding scratches and tiny low spots.
- Guide coat, block sanding, repeat until the panel is flat.
- Epoxy or a sealer as the last barrier before color.
A sealer is a thin, non-sanding layer that gives the topcoat a uniform surface. It stops the paint from sinking into different primers at different rates, which shows up later as dull patches. Some shops skip it when they finish in epoxy and shoot color inside the recoat window. Others always use it. Follow the system your paint maker publishes, and do not mix brands casually.
Block sanding the way a body man does it
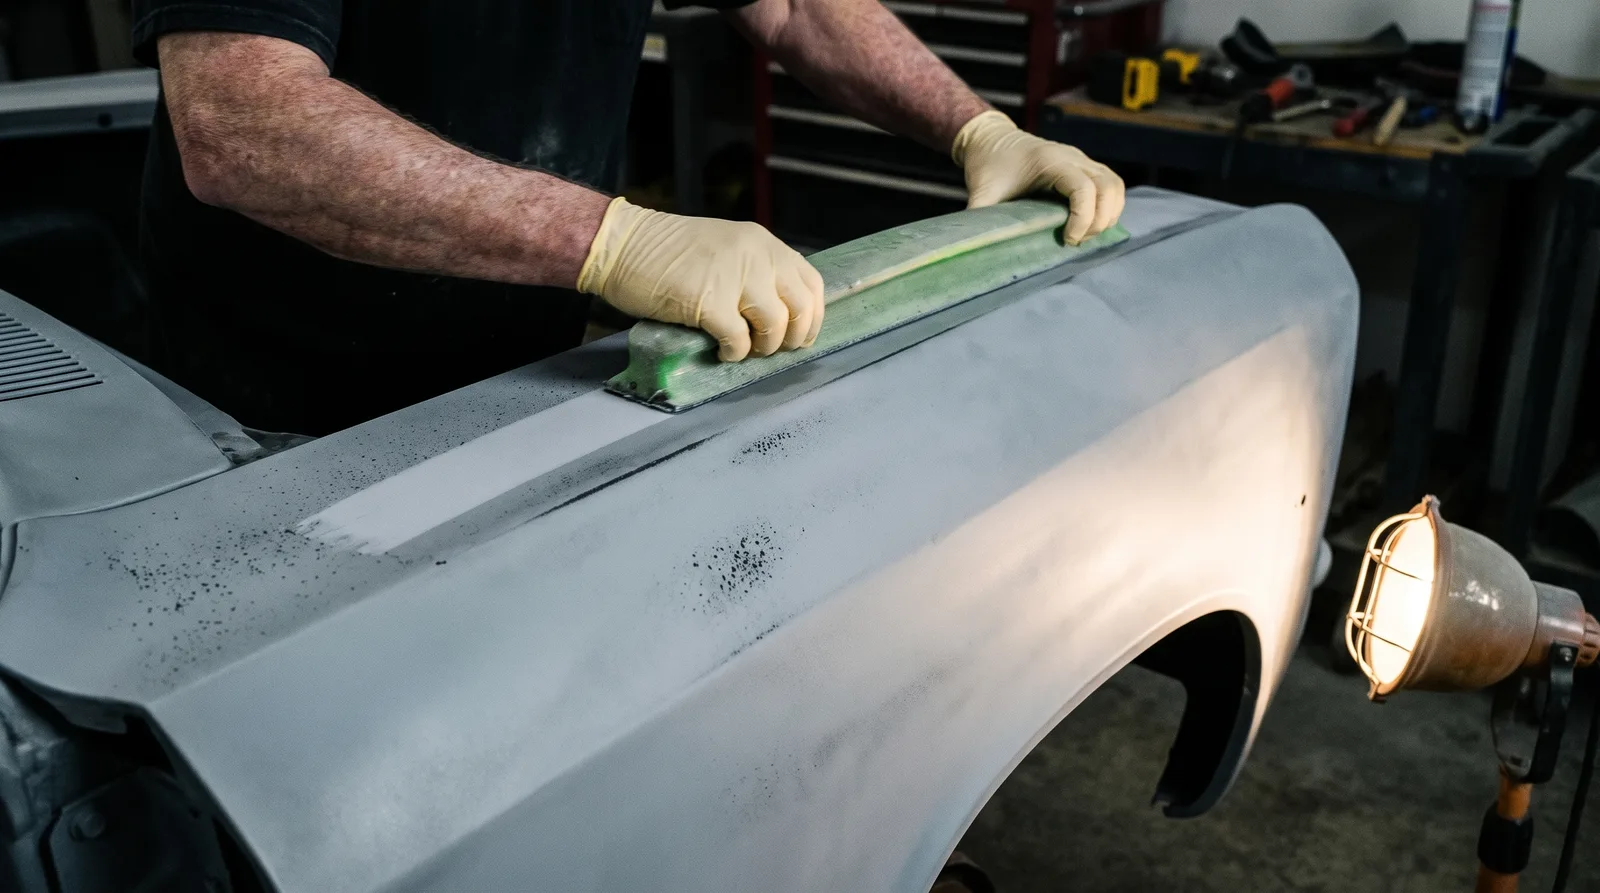
The block is a straightedge that you drag over the surface. A hand cannot feel a very slight dip, but a rigid or semi-rigid block will bridge it and cut the high spots only. That is how a panel comes out flat instead of faceted.
Start with a guide coat. This is a light dusting of a contrasting color, usually a dry powder or a cheap spray, over the primer. As you sand, the guide coat stays in the low spots and disappears from the highs. When every speck of the guide coat is gone and the surface is uniform, the panel is flat. If low spots remain, fill them and go again. This is the step that separates a true panel from one that only feels smooth.
Use the right block for the shape. A long, stiff board suits roofs, doors, and hoods. A shorter firm block works on quarter panels. Flexible rubber blocks follow curves and body lines. Always sand in an X pattern, working diagonally across the panel, so you do not carve a groove. Keep the block flat and change direction often.
Grit sequence and what to finish with
The correct final grit depends on what goes on top, so check the paint data sheet. As a general guide, high-build primer is leveled with 180 to 220 grit, then refined with 320 to 400 grit. Final sanding before a sealer or basecoat is commonly 400 to 600 grit for basecoat and clearcoat systems, with the finer end favored for metallics. Going finer than about 800 leaves too little tooth for the paint to grip. Single-stage enamels are more forgiving: some guides allow 320 to 360 grit, since the thicker enamel fills the scratches more easily than a basecoat and clear does. If you are weighing that choice, read the comparison on single-stage vs base/clear before you pick your final grit.
Never jump more than one step in grit. Going from 80 straight to 400 leaves the deeper scratches in place, and they come back as visible lines after paint. Sand every panel to the same finish so the surface reflects evenly under the clear.
Common mistakes that show up under the clear
Shortcuts are what ruin finished cars. The usual ones:
- Thick filler. Filler is for smoothing, not for rebuilding. Heavy layers shrink, crack, and ghost the repair years later. Fix the metal first.
- Sanding through the primer. If you break through to metal, spot it with epoxy before you continue. Do not paint over raw steel.
- Skipping the guide coat. Eyeballing flatness under a shop light is how waves get through.
- Rushing the recoat window. Primer and sealer have time limits for a chemical bond. Miss them and you must scuff and start over.
"If you sand a panel and it feels flat, you have not finished. Put the guide coat on and let the block tell you the truth."
Ray Delgado
What to budget and when to hand it off
Block sanding is labor, and labor is the cost. A thorough prep on a full car commonly runs many dozens of hours, and shops price it that way. Most of the hours in a quality paint job go into prep, which is why a quality driver-level paint job commonly runs about $10,000 to $20,000 and a full bare-metal respray about $20,000 to $40,000 at a professional shop, with show-level work above that. Body work and paint together on a driver-quality restoration are often budgeted around $12,000 to $25,000. Materials for a DIY job, covering epoxy, filler, high-build, sandpaper, and guide coat, usually run from the high hundreds into four figures depending on how many panels need work.
If your garage lacks a straight, well-lit space or you do not have the hours, hand the prep to a pro. Look for a body shop near you and ask to see a panel in primer under raking light. A shop that is proud of its block work will show you the surface before color goes on.
Sources and notes
- Correct sandpaper grit you should sand your car with, final grit of 400 to 600 before basecoat and clear, single-stage enamel at 320 to 360, nothing finer than 800
- Block sanding primer coats before paint, rigid and semi-rigid blocks, guide coat, 45 degree crosshatch pattern
- Primer surfacer sanding workflow, 180 to 400 grit progression and the role of a sealer
- Sandpaper grit guide for car paint, grit ranges between primer, basecoat and clearcoat stages
- Automotive paint (Wikipedia), primer, basecoat and clearcoat layers in a modern paint system
- Primer (paint) (Wikipedia), why metal needs a primer against moisture and rust
Related Reading

About the author
Ray Delgado
Metal fabricator and chassis builder who has spent 25 years turning flat sheet and mild steel into hot rods, gassers and restomod underpinnings.
More in Restoration & Tech


Comments (1)
L
leadsled_lenny
1 day ago
Guide coat, always.
D
deuce_coupe_dwayne
1 day ago
Lenny's right. Did my steel '32 five-window with a long board till every speck of guide coat was gone off the deck lid. Only way a deuce body comes out straight.
L
leadsled_lenny
1 day ago
Dwayne, a deuce deck lid is a fine teacher, but try blocking the hood on a chopped and nosed Merc where somebody leaded in the frenched headlights back in the fifties, because the guide coat will find every ripple where the lead met the steel and it will keep finding them for three rounds of high-build. When I was a young man at the Oakland show the guys with the best paint were the guys with the worst knuckles, and nobody talked about color until they had run a hand down the fenders, which is the same thing a guide coat does now, only more honest.